 Here's Lucy Saturday after getting her "Asian layered bob" haircut, but before getting her brows waxed at Elizabeth Arden The Red Door. Cute, huh?
Julia was the French Chef, and I'm not. These are her pots and pans hanging in the Smithsonian. I write about my pots and pans, foibles, food and family memories, and fun in the kitchen. Thank you for taking time to read some of my posts. If you leave a comment, you can be sure I'll read it. If you want to look at or purchase any Pampered Chef goodies, visit my personal website at www.pamperedchef.biz/susanmurray
Monday, December 20, 2010
A New Do
Here's Lucy Saturday after getting her "Asian layered bob" haircut, but before getting her brows waxed at Elizabeth Arden The Red Door. Cute, huh?

Sunday, December 19, 2010
Ode to the Pinto
 75 cents. That's how much I pay for a pound of dried pinto beans. That pound makes 13 servings (well, that's for normal people---it's half that many for me) which comes out to LESS THAN 6 CENTS PER SERVING. Is that the most unbelievable thing you've ever heard? Oh, but wait, you also have to add water and salt (or, Cavendar's if you're me) so that really might get the cost all the way up to a full 6 cents.
  But, of course, after you add a big piece of corn bread and some kind of hot pepper jelly or chow-chow, why, you might actually be approaching something crazy, like 10 cents per serving. For what must be my favorite meal, since I make it once a week. Nutritional value: TOPS. Ease of cooking: Please, what is there to actually DO when cooking a pot of beans?
When I was a kid, we called these "red beans" at our house; but at my friend Nancy's house they were "brown beans." Now I just call them fabulous.
I love you, pinto beans.
Cheese Straws from Leslie and Trish
Leslie and I have introduced each other to many things over
 Ingredients: 30 oz. sharp cheddar cheese, and 2 sticks of butter: let them set out on your counter overnight or until fully room temperature. 4 cups flour, 2 tsp. salt, 1/8 tsp. black pepper, 1/8 tsp. cayenne pepper, a dash of garlic powder.
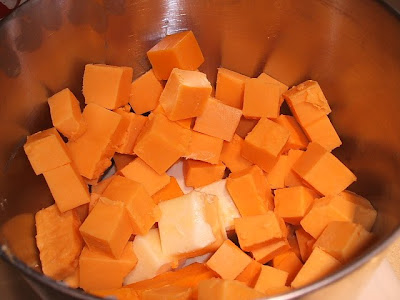 I diced up the butter and cheese into the mixer bowl. Use your heavy-duty beater and mix the cheese and butter "until the consistency of whipped cream." It takes about 30 minutes---more later on that.
 Sift 3 cups of the flour with the seasonings. You know, I used to have an actual flour sifter, but now I just use this. Sift onto a big sheet of wax paper that you have creased in the middle, to make it easy for you to add this to your mixer at the right time. Keep the 4th cup of flour separate. This is a good time to turn on your oven, to 325.
 I mix at speed 2 mostly, and occasionally crank it up to 4.
 About 4 or 5 times during the 30-minute mix time, I use my heavy duty Mix 'n Scraper (one of my favorite kitchen tools) to scrape down the sides of the bowl. I also take the whole thing off the mixer, remove the beater, and scrape under the beater a couple of times so that everything gets mixed in.
The batter is very stiff, so you'll need to put a little muscle into all of this and use heavy-duty tools----a wimpy spatula would break in a second.


 Now you're ready to fill your cookie press and start piping.
 Oops!
Oops!
 These look a little better. But I consider those squiggly ones cook's treats, so no problem.
 After about 20 minutes in the oven, here's what you have. I use parchment paper just to make clean-up easier and to be able to re-use my hot pans sooner (pipe out onto fresh parchment while a pan is still in the oven, and rotate.) I keep 4 baking sheets going, so the baking (boring) part goes much faster.

 Remember, it is more blessed to give than to receive. But these sure are yummy! Thank you, Leslie (I think).
the years. I trump, cause I introduced her to Randy! But she came close when she started making and sharing Trish Yearwood's cheese straws several years back. I would watch her pull the big zip-loc bags out of her suitcase when she came to visit, or I would open up a care package she went to the trouble of sending, and my mouth would start to water. I would sometimes hide the last bag from Lucy and Granny----I know, nothing to be proud of. This year I decided to try my hand at them myself. Lucy says mine aren't as spicy as Leslie's (and I think she means they're not as good) but I haven't had as much practice. Don't attempt this recipe unless you have the right tools for the job: a Kitchen Aid stand mixer, and a heavy-duty cookie press (the new Pampered Chef model with the rotating press works perfectly, and it has a potato ricer disc, to boot!).

I've made two batches so far. Takes me about 2 1/2 hours from start to finish, so be in the mood and don't do this while you're hungry, or you'll end up eating more than you pack up for giving---take it from me.
 Ingredients: 30 oz. sharp cheddar cheese, and 2 sticks of butter: let them set out on your counter overnight or until fully room temperature. 4 cups flour, 2 tsp. salt, 1/8 tsp. black pepper, 1/8 tsp. cayenne pepper, a dash of garlic powder.
 I diced up the butter and cheese into the mixer bowl. Use your heavy-duty beater and mix the cheese and butter "until the consistency of whipped cream." It takes about 30 minutes---more later on that.
 Sift 3 cups of the flour with the seasonings. You know, I used to have an actual flour sifter, but now I just use this. Sift onto a big sheet of wax paper that you have creased in the middle, to make it easy for you to add this to your mixer at the right time. Keep the 4th cup of flour separate. This is a good time to turn on your oven, to 325.
 I mix at speed 2 mostly, and occasionally crank it up to 4.
 About 4 or 5 times during the 30-minute mix time, I use my heavy duty Mix 'n Scraper (one of my favorite kitchen tools) to scrape down the sides of the bowl. I also take the whole thing off the mixer, remove the beater, and scrape under the beater a couple of times so that everything gets mixed in.
The batter is very stiff, so you'll need to put a little muscle into all of this and use heavy-duty tools----a wimpy spatula would break in a second.
After about 30 minutes, start to add the seasoned flour to the batter, about 1/4 to 1/2 cup at a time. To avoid a cleaning disaster, be sure to use your mixer's flour guard or drape a tea towel over the head of your mixer (long enough to cover the sides of the bowl.) Each time after you add the flour, mix just enough to get the flour well combined. Use as much of the extra 1 cup of flour as you need for the right texture...both times I made these I added about 1/2 cup.
 Now you're ready to fill your cookie press and start piping.
 Oops!
Oops! These look a little better. But I consider those squiggly ones cook's treats, so no problem.
 After about 20 minutes in the oven, here's what you have. I use parchment paper just to make clean-up easier and to be able to re-use my hot pans sooner (pipe out onto fresh parchment while a pan is still in the oven, and rotate.) I keep 4 baking sheets going, so the baking (boring) part goes much faster.
 Remember, it is more blessed to give than to receive. But these sure are yummy! Thank you, Leslie (I think).
Tuesday, December 14, 2010
Which is it?
 Are they garbanzo beans?
 Or are they chickpeas?
Who cares, when they're so delicious. Buy a bag of dried whatever-you-call-them, soak them in cold water for a few hours or overnight, drain and cover with fresh water and cook just until tender----I think it usually takes about 45 minutes or so. You owe it to yourself to try cooking them yourself instead of using canned ones. When they're almost done cooking, season liberally with Cavendar's Greek Seasoning (or salt and pepper, but if you don't cook with Cavendar's you're missing out big-time cuz this Arkansas product makes EVERYTHING taste better.) Then bake yourself a pan of cornbread and enjoy a super-healthy taste treat. The first time I cooked these from dried, instead of opening a can, Lucy didn't know what I had done but she immediately tasted the difference and asked why the garbanzo beans tasted so good. Now I buy them in bulk at Whole Paycheck (the canned ones taste slimy to me now...sorry) and cook up a super big pot so I can keep half in the freezer in small bags for whenever needed. These are perfect to throw in a salad, or to add to a whole wheat pita with whatever leftovers you have for a super work-day lunch.
Another favorite way to use half a batch is to spice and roast them. Drain cooked beans completely, and pat them with paper towels so that they're as dry as possible. Put them on your big bar pan in one layer and either spray or toss them with a tiny bit of olive oil and your favorite spices---I use cumin and a bit of cayenne, but my next batch will be in Old Bay. Roast them at around 450 until----here's the hard part----until they're very crispy but not burnt. It's a fine line, and I usually cross it with at least half of mine. But if they're not crispy-crunchy, they're really not worth it in the flavor and texture department, so step out there and take a chance. They're like munching on a big bowl of delicious nuts, but without any of the fat and a delicious flavor.
Monday, December 13, 2010
Mini Carrot Cake Cups
Our mama used to make delicious carrot cakes with cream cheese frosting, so this is a little way to remember Mildred on what would have been her 91st birthday. Enjoy!
Saturday, July 24, 2010
Salad Days
These two salads from Jane Brody's Good Food Gourmet are favorites from way back, and perfect for July. I've taken the Corn and Barley Salad to many a potluck for something just a little different, and people always love it. It would also be good with that quinoa you cooked and are not sure what to do with. Which reminds me, on the weekend I like to cook up a big batch of grains of one type or another---quinoa, barley, brown rice---as well as a pot of pinto, black, garbanzo or other beans. During the week these come together with some other ingredients to make many of our dinners and lunches, just by adding some freshly garlic-sauteed baby spinach and a crumble of feta cheese over the top of the grain; or adding a quick vinaigrette, some scallions, cumin, and parsley or cilantro for a lunch salad. It's a God-send to open the fridge and see bowls of grains and beans just waiting for you to do the tiniest bit of creative combination and prep. It also requires fewer brain cells, which are sorely lacking in my kitchen during the current heat wave.
Speaking of heat waves, Lucy and I are escaping off to Bermuda tomorrow via a big cruise ship leaving from the west side of Manhattan. One of the things we're most excited about, of course, is all the different restaurants on the ship. Melissa and Leslie, if one of them serves tapas, you'll know where to find us for the next 8 days! Bon Voyage.
Corn and Barley Salad
Salad:
- 3 cups water
- 1/2 tsp salt
- 1 cup barley
- 2 cups cooked corn kernels
- 1/2 cup thinly sliced scallions
- 1 large tomato, seeded and finely chopped
- 1 to 2 seeded and minced jalapenos
Dressing:
- 2 cloves garlic
- 3 TBSP white wine vinegar
- 2 TBSP olive oil
- 1/2 tsp cumin
- 1/2 tsp salt
- 1/4 tsp freshly ground black pepper
1/4 cup minced cilantro or fresh parsley
1. Cook the barley in a large pan of boiling salted water, stirring often until just tender---about 30 minutes for pearled barley, 40 minutes for unpearled. DO NOT OVERCOOK THE BARLEY. Drain in a colander, rinse it under cold water, and let it drain until cool.
2. Transfer cooled barley to a large bowl. Add corn, scallions, tomato, and peppers; toss well.
3. Mix dressing ingredients in a blender or food processor. Pour dressing over salad, toss the salad well to combine ingredients thoroughly. Cover the bowl and chill in refrigerator.
4. One hour before serving time, stir the parsley or silantro into the salad, and allow to come to room temp.
Orzo Pesto Salad
Whole wheat orzo is my pasta of choice these days. Sometimes my quick workday lunch is room-temp orzo topped with chopped fresh tomatoes and a spoonful of store-bought pesto. That reminded me of this salad.
- 1 pound whole wheat orzo
- Boiling salted water
- 1 1/2 cup fresh basil leaves, minced
- 1/4 cup minced parsley
- 4 cloves garlic, peeled and crushed
- 1/4 tsp salt
- 1/4 cup olive oil
- 1 large sweet red pepper, cored, seeded, chopped
1. Cook orzo in boiling salted water for 8 minutes; drain.
2. While the orzo cooks, combine remaining ingredients except red pepper in a large bowl. Add the drained orzo while it is still warm, mix the ingredients well, and refrigerate the salad.
3. Just before serving, add the red pepper and toss the salad.
Thursday, July 22, 2010
Polenta Pizza Crust


It's not possible. That's what I tell visitors here. It's just not possible to get bad pizza in New York, at least in my experience. Sister and I have our favorite place: Patsy's on 2nd Avenue. But you can walk into any Italian deli on the corner of East-where-the-heck-am-I and Get-me-out-of-here-before-something-really-bad-happens, and I swear you will get a tasty slice. Some may be a little greasier than you want, but the flavor and crust of every one of them will be super good. It just will.
But today I'm talking about homemade pizza. My own. I'm a leftover-eater, a behavior inherited from my mother. It's not that it bothers me to discard food (Lucy's the one who can't bear to throw it out, "But that would be wasting it!" Soooooo, it ends up in the fridge until I throw it out for her; what's wrong with this picture?). It's just that I love food so much, I want to eat every morsel of whatever it is. Pizza is a great "palate" for using leftovers. You can throw a few things together on a crust and end up with a piece of art that fully satisfies both your eyes and your (other kind of) palate.
Except for one thing. That crust thing I mentioned. Unless you happen to keep a ball of pizza dough in your fridge---which I have done at different times, mostly when I was extra fat, since my best shopping friend Trader Joe sells a great ball of whole wheat pizza dough for about a buck-fifty---you're kinda S.O.L. when the mood for pizza strikes or when just the right mix of leftovers present themselves. Being a WeWa member, I've been told all the low-cal, low-fat tricks for making a mini-pizza: use a split toasted pita; an English muffin; a multi-grain wrap. Yeah, yeah, I know. Some of them are ok, but not really. For one thing, I want a whole pizza, not some little fake mini thing. And I'm not willing to use the WeWa points for real dough. In fact, I am so stinkin' picky I want a real crust that costs me ZERO points. So what's a WeWa foodie to do?
Drumroll, please. Enter POLENTA, wonder food of the world! Seriously, this stuff is freakin' amazing. Just ask Leslie if you don't believe me----she's like some kind of creamy polenta pod-person. I've already mentioned on here that when I make creamy polenta, I now make extra and use it for a replacement fried cornbread fix. That experience got me thinking about the possibility of using polenta to make a super thin pizza crust. I DID IT! And IT'S DELICIOUS! I made last weekend's pot of creamy polenta a little thinner than usual (it would have thickened up more if I had continued to cook it a few more minutes). The part we ate as a creamy base for leftover tomato sauce mixed with haricot vert, pork cutlet (mine), fake chicken (Lucy's) and freshly grated parm was as delicious as always. The difference was that what I spread out in an olive-oiled bar pan was super, super thin. After it was covered in the fridge for a day, it was time for Dr. Frankenstein's polenta pizza crust experiment. I put the bar pan of super-thin polenta into a 400 degree oven and left it to crisp up. It also shrunk a good couple of inches away from the sides, and browned around the edges. Then I flipped it over to crisp on the other side while I got toppings ready for Southwest Pizza. My half, in order from the crust up: refried beans spread on just as if it was tomato sauce, salsa, shredded chicken breast (cooked), lightly sauteed red onion with yellow and red peppers, and a sprinkle of cilantro. Lucy's half: refried beans, salsa, freshly grated part skim mozzarella, same onion and pepper mixture, and cilantro. I popped it into the hot oven just until the cheese melted. On my slice (OK, on my multiple slices, cause we both ate the whole thing) I added a dollop of Greek yogurt, another spoonful of salsa, and more cilantro. We both deemed the Polenta Pizza Crust a rip roaring success.
Now, if you're a normal person (i.e., not a chubbette like me) you can just use a regular pizza crust for your nice Southwest Pizza and forget all this polenta nonsense. But if you like really thin crispy crust, as I do, or if you're a Simply Filling/Core WeWa'er who wants to avoid the use of flour and use zero points on her pizza, as I am, this is a solution. The Southwest Pizza variation lends itself to the polenta crust especially well, of course, but this technique is a keeper for us. We've already decided our next one will be a Greek Pizza: feta cheese, tomatoes, spinach, and other mediterranean goodness. My own New York pizza success, thank you very much.
Subscribe to:
Posts (Atom)