Showing posts with label Pampered Chef. Show all posts

Monday, September 12, 2011

Balsamic Body Heat


Women of a certain age, like me, have fond memories of the 1981 movie, Body Heat.  Maybe  it's because William Hurt was so uh, cute, at that age.  Or maybe it's because at the end of the movie, his poor pitiful self is in jail and Kathleen Turner is on a beach being all rich and left alone.  How often does it turn out that the girl gets the better deal?  But I digress.  In this movie, he becomes so totally obsessed with her that he loses all sense and acts in ways that are extremely dangerous and contrary to his nature.

If I am William Hurt, figs with gorgonzola and balsamic are my Kathleen Turner.

My haircut guy told me about these a couple of years ago in October.  He said it was too late to get fresh figs, but I was already obsessed before having one taste,  so I left the salon and went immediately in search of figs---and found them at the first place I stopped; see, fate has already intervened here.

He had told me that two to three of these make a lovely appetizer.  That would be one or one-and-a-half figs per serving.  The fresh Black Mission figs come 27 to a box, so one box makes 18 appetizer servings, according to normal people.  Remember how I said William Hurt got about Kathleen Turner?  Well, I fixed half the box (9 servings) and ate them all except for the reasonable few that Lucy nibbled.  Then the next day I did the same thing, only Lucy wasn't home so I ate all 9 of that day's servings myself.  And I knew it was wrong.  Just like William Hurt knew it was wrong to kill Richard Crenna.  But. I. Didn't. Care.

Some of Leslie's good pecans and a glass of wine make the perfect accompaniments.

Figs with Gorgonzola and Balsamic

Cut fresh, ripe figs in half lengthwise.

Use your Pampered Chef Small Scoop (or a spoon) to scoop out just enough fig flesh to make a small indentation.  Put crumbled gorgonzola cheese in the indentation--I stuff as much as I can and kind of let it ooch out the top.

Put the filled figs on a broiler-safe pan (don't use your P Chef stoneware under the broiler; I use my P Chef metal baking pan) and pop them under the broiler for a couple of minutes, just until the cheese gets nice and melty.  When you take them out of the broiler, splash each with just a teeny-tiny bit of balsamic vinegar.

Fresh figs are in season right now.  Go ahead.  Get all obsessed and Body Heat about these.  You know you want to.

Wednesday, January 12, 2011

If you give a mousse some cream

The snow forecast lead all the schools in the area to declare today a snow day well in advance, so yesterday I rushed home to make preparations....er, actually, I rushed home to make mousse. Same thing, right? I went to my neighborhood Italian market to pick up ricotta cheese and whipping cream. Let it snow! First, 2 cups part-skim ricotta with 3 TBSP unsweetened cocoa. My addition, which I highly recommend for a BIG flavor bump, is a bit of espresso powder. Throw these things in the food processor until heavenly smooth. Then scoop out every last morsel with your Pampered Chef scraper and put into a big bowl. Put 2 large egg whites (best if they're at room temp, but I couldn't wait), 1/2 cup sugar (I used less), and a pinch of salt into a glass bowl on top of a little pan of simmering water. (Your bowl shouldn't touch the water---and don't boil the water, just let it simmer.) Whisking the whole time, cook until the sugar dissolves and the mixture is warm---around 3 minutes.

Then, take the glass bowl out and use an electric mixer to beat the egg white mixture until it forms stiff peaks.

To prove they are stiff peaks, hold the bowl upside down over Lucy's head and watch her squirm.

Yep, those are some stiff peaks.

Then FOLD a big dollop of the egg whites into the chocolate mixture. Ahhhh, folding.....a favorite technique that I could drive into the ground, so will try not to here. If you don't know the technique, google it up and be sure to follow it for best results.

Scoop the mousse into 6 small bowls, like these cute Willow House ramekins my sister sent me. We love ramekins! Now, here comes the hardest part of the recipe: Chill for 3 hours. Harrumph.
When the torturous 3 hours is almost done, drag your daughter into the kitchen to see the delight of whipping real cream (I'm embarrassed that she says she only knows the taste of Cool Whip---really? Granted, we really don't eat much of either at our house, but obviously I've been a most neglectful parent). I taught her the trick of chilling the beaters and stainless steel bowl--I put them in the freezer at the same time I put the mousse in the fridge, a bit of overkill but if I didn't do it then I would forget. Add a couple of tablespoons of confectioners sugar and about 1/2 tsp of vanilla, and let her rip on medium speed for ..... I don't know how long, probably less than 2 minutes, just until decadently soft and luscious. Grab a couple of mousse ramekins out of the fridge, top with big dollops of whipped cream, and sit back and contemplate another snow day.
Here's Lucy eating nachos while waiting for the mousse to chill. Lovely headgear.


Saturday, January 8, 2011

Fruit Loops

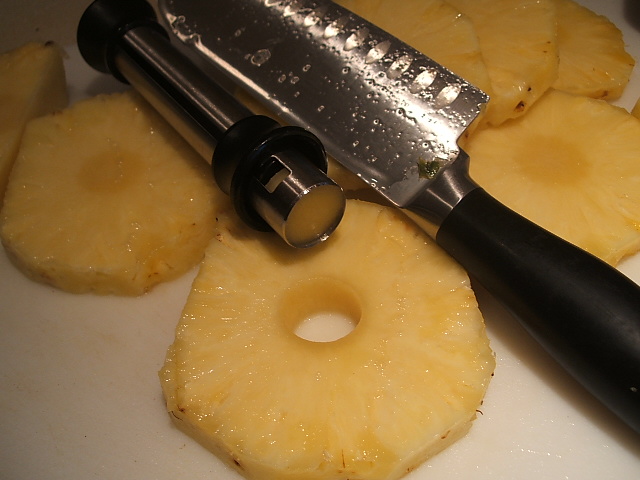
Last week at my WeWa meeting we reviewed a list of in-season fruits and veg, and I've been hungry for pineapple ever since. SCORE! Today I picked one up at Apple Farm, my fruit and veg market, for $1.99. Big mistake. I should have bought at least 2, probably 3---considering that I had to stop and eat the very first piece I cut, before I could even continue. Sweet, juicy, perfectly ripe...in fact, perfect in every way. I quickly put the rest in the fridge for L and me to nibble on, hopefully for a few days, but I kept thinking how much someone with little fat 3-year-old fingers would love to have one of those rings for a snack. So, if you have some of those little fat fingers at your house (or even if you don't!) look for a fresh pineapple this week, and enjoy.

Since I used to avoid buying whole pineapple
s because I didn't know how to prepare them, I thought it might be good to throw a visual tutorial in here.


Thank you, Pampered Chef apple corer!

By the way, I have a big pineapple corer/slicer from The Pampered Chef, but I find it easier to just use my big Santoku Chef's Knife.

Thursday, December 30, 2010

'Tis the SEASON

Ahhhhh. The car is dug out of its blizzard-ness, and so are we. Lucy is cruising around Soho with a couple of friends and her camera (at least, I guess she is...she was supposed to text me when her train got to the city...hmmmmm), the robot is vacuuming, and the vegetables are roasting in a 425 degree oven. Surely all is right with the world. The initial idea with the butternut squash was to roast it with some spices and red onion, and then make soup. But who am I kidding? Now that I smell it, there's no way I will puree any of the roasty, carmelized goodness that will come out of the oven. I LOVE any kind of roasted veg by itself; over a whole grain like bulgur, whole wheat couscous, or quinoa; over whole wheat pasta with a fresh grind of black pepper and parmesan cheese; and two days later for lunch in a whole wheat pita along with a smear of tahini-free hummus and whatever else happens to be left over in the fridge.
I almost was going to give you the specific low-down on how to roast the cauliflower, but I did that on an earlier post and don't want to show the full level of my dementia by repeating. Although, if ever there was anything to repeat about, it's roasted cauliflower. Ever since Melissa started making this a few years ago, it's one of the things I crave and can't get enough of its nutty deliciousness.
Since this post is supposed to be about seasoning, just let me say two things about the salt and pepper that flavors the cauliflower. 1. If you don't already have it, stop what you're doing and go to the grocery store and buy KOSHER SALT. Use it EVERY time you salt something (unless you use sea salt, but that's lots more expensive), except for baking; it's preferable to use Morton's plain-old salt for baking. But Kosher salt is waaaaaaaaaaaayyyyyyy better for all your other cooking---a significant flavor bump you'll come to appreciate. 2. Use FRESHLY GROUND PEPPER from a pepper mill for all your cooking. Just do it. I keep a one-handed pepper mill at the stove to make life easier, and I use my Pampered Chef silicone funnel to re-fill it, or otherwise I have a huge mess on my hands and little peppercorns everywhere.
After Thanksgiving I made a little business trip to Hartford CT and found myself near a Penzeys spice store, where I bought one of their new spice blends, Arizona Dreaming. The ingredients label reads, "spices (must be the secret part), ground ancho, onion, garlic, paprika, citric acid, lemon peel, chipotle pepper, red pepper, jalapeno, cocoa, natural smoke flavoring." I've been using it on everything where I want a little kick, and my butternut squash will be particularly tasty.Speaking of which....in the time it's taken me to write to you, both the cauliflower and the squash are out of the oven. You know it's a good day when I have two Pampered Chef bar pans full of roasted goodness calling my name. Go roast yours.

Wednesday, December 29, 2010

Trail Mix Cookies

A while back Leslie gave me what Lucy and I have dubbed "The Magic Cookbook," because EVERY recipe you make from it is guaranteed to be super-successful (read as absolutely delicious.) We LOVE that cookbook. Well, for my Christmas Miss Lucy outdid herself when she located the new HEALTHY version of this cookbook. We were both so excited to have it....YIPPEE! There is even a recipe for the incredible Tarte Tatin that Leslie makes from the other book, with pears from her own trees. I've spent the last few days snowed in and reading every single recipe. So, why did I choose a cookie recipe as my first thing to try? There are tons of recipes for healthy grains, soups, and stir-fries, but I had to start with COOKIES after pigging out on sweets galore for the past two weeks. Well, they are delicious.

Trail Mix Cookies

1 cup (3 oz. if you weigh instead) old fashioned rolled oats
1/2 cup (2 3/4 oz.) whole wheat flour
1/4 cup (1 1/2 oz.) all purpose flour
1/2 tsp salt
1/4 tsp cinnamon
1/4 tsp baking soda
5 TBS unsalted butter, melted and cooled
1 large egg
2 tsp vanilla
1 cup (7 oz) packed brown sugar
1/2 cup dried cherries, cranberries, or raisins
1/2 cup unsalted sunflower or pumpkin seeds
1/4 cup peans, walnuts, or almonds, toasted and coarsely chopped
1/4 cup semisweet chocolate chips

1. Preheat oven to 350. Line 2 large baking sheets with parchment paper. Whisk oats, flours, salt, cinnamon, and baking soda together in a bowl.
2. In a large bowl, whisk melted butter, egg, and vanilla together. Stir in sugar until smooth, smearing any remaining clumps of sugar against side of bowl. Stir in the oat mixture until just combined, then stir in cherries, seeds, nuts, and chips.
3. Working with 1 heaping TBS of dough at a time, roll into balls and lay on parchment/pan, spaced 2 inches apart.
4. Bake one sheet at a time, until edges are set and beginning to brown but centers are still soft, puffy, and underdone, 12 to 16 minutes; rotate halfway through baking. NOTE: On my metal baking sheet with parchment, I baked for 8 minutes, rotated, and baked for 5 minutes more. On my Pampered Chef stone bar pan without parchment, I baked for 8 minutes, rotated, and baked for 8 minutes more.
5. Let cookies cool on baking sheet for 10 minutes, then serve warm or transfer to a wire rack and let cool completely. NOTE: You should have seen Lucy's face when I brought her a plate of two warm cookies and a glass of milk!

Because lower-fat cookies don't store well, I baked a little more than half the dough and shaped the rest into balls and froze them on a baking sheet, then transferred them to a zip-lock freezer bag labelled: "Trail Mix Cookies #10. Do not thaw. Bake 12-16 minutes at 350."

Don't you love having your own home-made cookie dough in the freezer?

Sunday, December 19, 2010

Cheese Straws from Leslie and Trish

Leslie and I have introduced each other to many things over
the years. I trump, cause I introduced her to Randy! But she came close when she started making and sharing Trish Yearwood's cheese straws several years back. I would watch her pull the big zip-loc bags out of her suitcase when she came to visit, or I would open up a care package she went to the trouble of sending, and my mouth would start to water. I would sometimes hide the last bag from Lucy and Granny----I know, nothing to be proud of. This year I decided to try my hand at them myself. Lucy says mine aren't as spicy as Leslie's (and I think she means they're not as good) but I haven't had as much practice. Don't attempt this recipe unless you have the right tools for the job: a Kitchen Aid stand mixer, and a heavy-duty cookie press (the new Pampered Chef model with the rotating press works perfectly, and it has a potato ricer disc, to boot!).
I've made two batches so far. Takes me about 2 1/2 hours from start to finish, so be in the mood and don't do this while you're hungry, or you'll end up eating more than you pack up for giving---take it from me.
Ingredients: 30 oz. sharp cheddar cheese, and 2 sticks of butter: let them set out on your counter overnight or until fully room temperature. 4 cups flour, 2 tsp. salt, 1/8 tsp. black pepper, 1/8 tsp. cayenne pepper, a dash of garlic powder.
I diced up the butter and cheese into the mixer bowl. Use your heavy-duty beater and mix the cheese and butter "until the consistency of whipped cream." It takes about 30 minutes---more later on that.
Sift 3 cups of the flour with the seasonings. You know, I used to have an actual flour sifter, but now I just use this. Sift onto a big sheet of wax paper that you have creased in the middle, to make it easy for you to add this to your mixer at the right time. Keep the 4th cup of flour separate. This is a good time to turn on your oven, to 325.
I mix at speed 2 mostly, and occasionally crank it up to 4. About 4 or 5 times during the 30-minute mix time, I use my heavy duty Mix 'n Scraper (one of my favorite kitchen tools) to scrape down the sides of the bowl. I also take the whole thing off the mixer, remove the beater, and scrape under the beater a couple of times so that everything gets mixed in.
The batter is very stiff, so you'll need to put a little muscle into all of this and use heavy-duty tools----a wimpy spatula would break in a second.
After about 30 minutes, start to add the seasoned flour to the batter, about 1/4 to 1/2 cup at a time. To avoid a cleaning disaster, be sure to use your mixer's flour guard or drape a tea towel over the head of your mixer (long enough to cover the sides of the bowl.) Each time after you add the flour, mix just enough to get the flour well combined. Use as much of the extra 1 cup of flour as you need for the right texture...both times I made these I added about 1/2 cup.
Now you're ready to fill your cookie press and start piping.

Oops!
These look a little better. But I consider those squiggly ones cook's treats, so no problem.
After about 20 minutes in the oven, here's what you have. I use parchment paper just to make clean-up easier and to be able to re-use my hot pans sooner (pipe out onto fresh parchment while a pan is still in the oven, and rotate.) I keep 4 baking sheets going, so the baking (boring) part goes much faster.

Remember, it is more blessed to give than to receive. But these sure are yummy! Thank you, Leslie (I think).

Monday, December 13, 2010

Mini Carrot Cake Cups


Our mama used to make delicious carrot cakes with cream cheese frosting, so this is a little way to remember Mildred on what would have been her 91st birthday. Enjoy!


Sunday, July 18, 2010

Where there's a will, there's ..... applesauce!


Don't you hate it when you think you have an ingredient, so you don't buy it while you're at the store, then when it's time to make your recipe you don't have it after all. Harrumph. Makes me want to do a Rumpelstiltskin and stomp my feet so hard. But, wait, happy ending after all, just like all those scary, weird fairy tales.

I wanted to make oatmeal muffins with shredded carrots---one of I'm sure a gazillion variations you could make with that oatmeal muffin recipe. But, alas, no applesauce. Too danged hot to think about going back to the store....lots of gala apples and one granny smith in the crisper....hmmmmm, I'll just make a little applesauce. I cored and cut up 2 gala's and 1 granny smith (I didn't peel them cuz I like the peel) into a heavy pot; added 1 TBSP sugar; about 1/2 cup water; tiny pinch of salt; put the lid on and cooked over medium heat for about 15 minutes, just until the apples broke down. I stirred with a wooden spoon a few times while it cooked. After it was done it was still too chunky to put in the muffins, so I used my handy-dandyPampered Chef Mix 'n Masher (the black stick thing in the picture) to mash it up in the pan. This is the little tool that Libby swears every parent must have as soon as a toddler starts to eat any table food----works like a charm, even though it's actually made to break up ground meat when you're browning it.

After I made the muffins I still had more than a cup of applesauce left, so of course I tasted it as I was putting it away. WOW! I forgot how good homemade chunky applesauce tastes, and how satisfying it is to take the 20 minutes to make it. I used to make this for Lucy when she was little, and as soon as I took the taste it made me remember how making that applesauce for her made me feel like I was the best mom in the world. I mean, even though I didn't have a clue of how to be a parent and still don't, anyone who would make homemade applesauce for their child couldn't be all bad, right? Heck, I saw Diane Keaton in Baby Boom at least ten times.

If you're making this for a brand new eater, you'll want to peel the apples and mash it up really good after it cooks, or even puree it. But for a sweet little three-year-old who is so precious and whose Tia misses him so much she can't stand it (but I digress, sorry) chunky applesauce made by his very own mama in 20 minutes will just reinforce that she's the very best mama and he's the very best big brother in the whole world.

Here's a real recipe in case you want to make a bigger batch, from America's Test Kitchen's Family Cookbook.

Old-Fashioned Applesauce

4 pounds Jonagold, Pink Lady, Jonathan, or Macoun apples (8 to 12) cored and cut into 1 1/2 inch chunks
1 cup water, plus extra as needed
1/4 cup sugar, plus extra for seasoning
Pinch salt

1. Combine all ingredients in a large Dutch oven. Cover and cook over medium-low heat, stirring occasionally, until the apples begin to break down, 15 to 20 minutes.
2. Process the cooked apples through a food mill fitted with a medium disk. (Susan's note: huh?) Season with extra sugar or add water to adjust the consistency as needed. Serve warm or cool to room temperature, about 1 hour. Can be refrigerated for up to 1 week.

Susan's note: Just like with apple pies, I recommend that you use a mix of two different kinds of apples when you make this applesauce.

p.s. The muffins turned out really yummy, with 1/2 cup of applesauce and 1+ cup of shredded carrots. Oops, I forgot to add any sugar! Oh, well, they still taste good---all the better if no added sugar.

Saturday, July 17, 2010

Oatmeal Muffins


Penny, I think you would like these. And a shout-out to Sharon Baker---these have your name written all over them. Bake them once a week and keep on hand (I store mine in the fridge in a flat Tupperware thing). A great grab-and-go breakfast, especially if you add a dab of peanut butter. Good snack any time. We only have these 3 left, so I'm making another batch tomorrow for the week but instead of the banana I'm going to add 1/2 cup applesauce and grated carrots, so that it's kinda like a carrot cake. I'll be sure to add some fresh nutmeg to that one, in addition to cinnamon spice blend. You could also use a cut up apple....whatever you like. Oooh, Libby, I think they would make a great healthy kids snack, too, since little chubby fingers tend to like self-contained things like muffins they can grab themselves.

But in thinking about what makes it easy for me to just whip up a batch of these whenever I want, it's cuz I have the tools that work and make it so easy. This is not an advertisement for my Pampered Chef business, but these things really make all the difference for me. My muffin-making kit includes a Batter Bowl with lid, Large Scoop (perfect size for muffins--you want them uniform so they all bake at same time), Mix 'n Scraper, and Muffin Pan. This muffin pan is new, and I love it so much. Great for mini meat loaves, my mini quiches, etc. It's professional quality aluminized steel and cooks beautifully, then the clean-up takes 2 seconds at the sink and it's done. In case you're a piglet like me (well, granted, nobody is a piglet quite like me) muffins are built-in portion control for anything you would normally bake like a cake or bread. If you decide you need any of these tools, just holler or go here: www.pamperedchef.biz/susanmurray


Oatmeal Muffins

2 c uncooked oatmeal (old fashioned or quick)
1 ½ tsp baking powder
½ tsp salt
1 c fat free skim milk (or what you want)
2 eggs (or ½ c egg beaters)
1 mashed up banana
1/4 c sugar
1 tsp vanilla
1 tsp ground cinnamon (I use P Chef Cinnamon Spice Blend)
1 tsp Canola Oil

Preheat oven to 350. Spray muffin tin – makes 8-9 large.

Combine wet ingredients. Add dry ingredients. Spray muffin tins, or coat with Pan-Eze. Bake 35-45 minutes (until golden brown)

You can change these muffins up; use 1/2 cup applesauce instead of the banana (probably increase sugar to closer to 1/2 cup if you use unsweetened applesauce); 1 pureed unpeeled apple. Another variation - Along with the applesauce, add 1 small dry package of either vanilla or banana instant sugar free fat free pudding mix. This is also good (I’ve been told) using pumpkin pie filling (unsweet) or just pureed pumpkin in place of the applesauce. Be sure to spice to fit whatever add-in's you're using.