Showing posts with label Dinner Plates. Show all posts

Saturday, January 1, 2011

Happy New Year on a Plate

Black-eyed peas: you knew it had to be. Frozen---my current preference, as they are fresher tasting than dried. I don't care for canned so much.
Brussel sprouts: roasted, from frozen. This was an expansion of the required greens genre, for us southerners. First time I used frozen, and they're not as good as using fresh...a little mushy inside. Maybe because when roasting fresh ones, you can cut them in half first. Anyway, I accomplished my two goals: having something a little bit along the lines of greens, and using up something from the freezer.
Baked sweet potato: perfection, topped only with sea salt and freshly ground pepper. There was one left in the basket, perfect for L and me to split.
Brown rice: a base for the peas, leftover from the fridge.
Cornbread: from the freezer, fried.
If you notice a theme here, yes, I'm working on the end-of-year and out-of-cash-after-the-holidays plus it's-just-a-good-thing-to-do-every-once-in-a-while cook out of the freezer, pantry, and fridge-a-thon. Try it: you'll feel thrifty, and you'll eat up a lot of good stuff you forgot you had. Next on my list? Scallops stir-fry with garlic, bell peppers, scallions, brown rice, and haricot verts. I wish I hadn't just eaten so I could fix it now.
All the best for 2011!

Thursday, December 30, 2010

'Tis the SEASON

Ahhhhh. The car is dug out of its blizzard-ness, and so are we. Lucy is cruising around Soho with a couple of friends and her camera (at least, I guess she is...she was supposed to text me when her train got to the city...hmmmmm), the robot is vacuuming, and the vegetables are roasting in a 425 degree oven. Surely all is right with the world. The initial idea with the butternut squash was to roast it with some spices and red onion, and then make soup. But who am I kidding? Now that I smell it, there's no way I will puree any of the roasty, carmelized goodness that will come out of the oven. I LOVE any kind of roasted veg by itself; over a whole grain like bulgur, whole wheat couscous, or quinoa; over whole wheat pasta with a fresh grind of black pepper and parmesan cheese; and two days later for lunch in a whole wheat pita along with a smear of tahini-free hummus and whatever else happens to be left over in the fridge.
I almost was going to give you the specific low-down on how to roast the cauliflower, but I did that on an earlier post and don't want to show the full level of my dementia by repeating. Although, if ever there was anything to repeat about, it's roasted cauliflower. Ever since Melissa started making this a few years ago, it's one of the things I crave and can't get enough of its nutty deliciousness.
Since this post is supposed to be about seasoning, just let me say two things about the salt and pepper that flavors the cauliflower. 1. If you don't already have it, stop what you're doing and go to the grocery store and buy KOSHER SALT. Use it EVERY time you salt something (unless you use sea salt, but that's lots more expensive), except for baking; it's preferable to use Morton's plain-old salt for baking. But Kosher salt is waaaaaaaaaaaayyyyyyy better for all your other cooking---a significant flavor bump you'll come to appreciate. 2. Use FRESHLY GROUND PEPPER from a pepper mill for all your cooking. Just do it. I keep a one-handed pepper mill at the stove to make life easier, and I use my Pampered Chef silicone funnel to re-fill it, or otherwise I have a huge mess on my hands and little peppercorns everywhere.
After Thanksgiving I made a little business trip to Hartford CT and found myself near a Penzeys spice store, where I bought one of their new spice blends, Arizona Dreaming. The ingredients label reads, "spices (must be the secret part), ground ancho, onion, garlic, paprika, citric acid, lemon peel, chipotle pepper, red pepper, jalapeno, cocoa, natural smoke flavoring." I've been using it on everything where I want a little kick, and my butternut squash will be particularly tasty.Speaking of which....in the time it's taken me to write to you, both the cauliflower and the squash are out of the oven. You know it's a good day when I have two Pampered Chef bar pans full of roasted goodness calling my name. Go roast yours.

Wednesday, December 22, 2010

Penny's Brown Rice

Penny is a trendsetter. She ate brown rice and whole wheat pasta long before anyone else did. I used to couldn't stand (sorry, poor grammar on my part there) either one of those things, and now they're staples in my pantry---much preferred to the white versions. Of course, that relationship was cemented once I realized that on myWeWa eating plan, brown rice and whole wheat pasta both have ZERO points, and their white cousins have a zillion points. But I digress.

I sent Penny a box of Pampered Chef goodies for her new kitchen---What was I thinking? She doesn't cook!---including a microwave rice cooker. Penny, I promise you it will be a life-changing thing if you just cook up a pot of brown rice once a week, eat part of it, save the rest in the fridge, and then a couple of days later make yourself a yummy stir-fry.....in ten minutes! These step-by-step directions will give you perfect brown rice---super cheap, super nutritious, and you don't have to leave your house to go pick it up: you make it yourself. See, that's what cooking means, darlin'.
1. Measure out 1 cup of brown rice (NOT instant or minute rice, just regular long-grain brown rice.) Put it in the bottom of your rice cooker, and then add about 1 teaspoon of salt and 2 1/2 cups of cold water.
2. Put the white/clear inner lid on top of your rice cooker---be sure the edges/ridges are on the top. Then put the brown lid on top of that, and lock the sides in the up position.
3. Put the cooker in the microwave. You want to set
it to cook as follows: first, cook it for 10 minutes on HIGH power, then for 25 minutes on MEDIUM (50%) power. Your microwave will probably let you set them both at one time, so you don't have to re-set after 10 minutes. (Push 10:00, power, 10; then push 25:00, power, 5; then START).
THAT'S ALL! After it cooks, take it out and let it set for 5 minutes before you take off the lid. Be careful, there will be some steam.
Here's what it will look like when you take off the lid, with little holes in it.

This is after you fluff it with a fork.
Because I needed to make some rice to take these pictures, Lucy and I had this for dinner: brown rice topped with fresh spinach sauteed in garlic-infused oil, salt, and pepper; and topped with parmesan cheese and tomatoes. It was tasty.
I have 2 cups of rice in the fridge now, for a meal later in the week. One of Lucy's favorite dinners (she can make it herself, so you SHOULD be able to as well, Penny!) is to make a quick stir-fry. She heats a little oil in a skillet, throws in a little fake chicken or tofu (or nothing if she wants just veggies), adds a package of stir-fry veggies from the freezer, stirs them all around for a few minutes until almost done, adds the cooked rice to the skillet, then pours in some Thai Peanut Sauce or Ginger-Wasabi sauce (I think I sent you both) and heats it all through. There's not an easier, quicker dinner to make----and it's as good as Pei-Wei without ever leaving home. You can even buy some chicken tenders to cook in there, or a little pork cutlet that you chop up---they cook so quickly, just do them first in the oil, then add the frozen vegetables.

Am I kidding myself, or might Penny actually start to cook her own brown rice? Stay tuned, for the next portion of "As the World Turns." I love you, Peeeeeeeeeeny!

Sunday, December 19, 2010

Ode to the Pinto

75 cents. That's how much I pay for a pound of dried pinto beans. That pound makes 13 servings (well, that's for normal people---it's half that many for me) which comes out to LESS THAN 6 CENTS PER SERVING. Is that the most unbelievable thing you've ever heard? Oh, but wait, you also have to add water and salt (or, Cavendar's if you're me) so that really might get the cost all the way up to a full 6 cents.
But, of course, after you add a big piece of corn bread and some kind of hot pepper jelly or chow-chow, why, you might actually be approaching something crazy, like 10 cents per serving. For what must be my favorite meal, since I make it once a week. Nutritional value: TOPS. Ease of cooking: Please, what is there to actually DO when cooking a pot of beans?

When I was a kid, we called these "red beans" at our house; but at my friend Nancy's house they were "brown beans." Now I just call them fabulous.

I love you, pinto beans.


Thursday, July 22, 2010

Polenta Pizza Crust


It's not possible. That's what I tell visitors here. It's just not possible to get bad pizza in New York, at least in my experience. Sister and I have our favorite place: Patsy's on 2nd Avenue. But you can walk into any Italian deli on the corner of East-where-the-heck-am-I and Get-me-out-of-here-before-something-really-bad-happens, and I swear you will get a tasty slice. Some may be a little greasier than you want, but the flavor and crust of every one of them will be super good. It just will.

But today I'm talking about homemade pizza. My own. I'm a leftover-eater, a behavior inherited from my mother. It's not that it bothers me to discard food (Lucy's the one who can't bear to throw it out, "But that would be wasting it!" Soooooo, it ends up in the fridge until I throw it out for her; what's wrong with this picture?). It's just that I love food so much, I want to eat every morsel of whatever it is. Pizza is a great "palate" for using leftovers. You can throw a few things together on a crust and end up with a piece of art that fully satisfies both your eyes and your (other kind of) palate.

Except for one thing. That crust thing I mentioned. Unless you happen to keep a ball of pizza dough in your fridge---which I have done at different times, mostly when I was extra fat, since my best shopping friend Trader Joe sells a great ball of whole wheat pizza dough for about a buck-fifty---you're kinda S.O.L. when the mood for pizza strikes or when just the right mix of leftovers present themselves. Being a WeWa member, I've been told all the low-cal, low-fat tricks for making a mini-pizza: use a split toasted pita; an English muffin; a multi-grain wrap. Yeah, yeah, I know. Some of them are ok, but not really. For one thing, I want a whole pizza, not some little fake mini thing. And I'm not willing to use the WeWa points for real dough. In fact, I am so stinkin' picky I want a real crust that costs me ZERO points. So what's a WeWa foodie to do?

Drumroll, please. Enter POLENTA, wonder food of the world! Seriously, this stuff is freakin' amazing. Just ask Leslie if you don't believe me----she's like some kind of creamy polenta pod-person. I've already mentioned on here that when I make creamy polenta, I now make extra and use it for a replacement fried cornbread fix. That experience got me thinking about the possibility of using polenta to make a super thin pizza crust. I DID IT! And IT'S DELICIOUS! I made last weekend's pot of creamy polenta a little thinner than usual (it would have thickened up more if I had continued to cook it a few more minutes). The part we ate as a creamy base for leftover tomato sauce mixed with haricot vert, pork cutlet (mine), fake chicken (Lucy's) and freshly grated parm was as delicious as always. The difference was that what I spread out in an olive-oiled bar pan was super, super thin. After it was covered in the fridge for a day, it was time for Dr. Frankenstein's polenta pizza crust experiment. I put the bar pan of super-thin polenta into a 400 degree oven and left it to crisp up. It also shrunk a good couple of inches away from the sides, and browned around the edges. Then I flipped it over to crisp on the other side while I got toppings ready for Southwest Pizza. My half, in order from the crust up: refried beans spread on just as if it was tomato sauce, salsa, shredded chicken breast (cooked), lightly sauteed red onion with yellow and red peppers, and a sprinkle of cilantro. Lucy's half: refried beans, salsa, freshly grated part skim mozzarella, same onion and pepper mixture, and cilantro. I popped it into the hot oven just until the cheese melted. On my slice (OK, on my multiple slices, cause we both ate the whole thing) I added a dollop of Greek yogurt, another spoonful of salsa, and more cilantro. We both deemed the Polenta Pizza Crust a rip roaring success.

Now, if you're a normal person (i.e., not a chubbette like me) you can just use a regular pizza crust for your nice Southwest Pizza and forget all this polenta nonsense. But if you like really thin crispy crust, as I do, or if you're a Simply Filling/Core WeWa'er who wants to avoid the use of flour and use zero points on her pizza, as I am, this is a solution. The Southwest Pizza variation lends itself to the polenta crust especially well, of course, but this technique is a keeper for us. We've already decided our next one will be a Greek Pizza: feta cheese, tomatoes, spinach, and other mediterranean goodness. My own New York pizza success, thank you very much.

Monday, July 19, 2010

Stars, Stripes, and Quinoa

Quinoa and Tomato Salad
(recipe courtesy of WeWa)
Quinoa is a nutrition powerhouse. I used to not care for it, but now I have lots of recipes that are really tasty. I'm not sure I knew to rinse it before it's cooked, when I used to fix it. I had a hard time deciding whether to use fresh basil or cilantro (had no chives) in this recipe but finally decided on basil. Cilantro would have gone nicely with our pinto beans, roasted cauliflower, and fried polenta, but the basil was calling my name. By the way, it sounds like "keen-wah." I always try to make some extra quinoa, cause some mornings I like to stir it into my Greek yogurt for breakfast and add a little cinnamon spice blend and freshly grated nutmeg.

The stars and stripes part is at the very bottom of this posting.

Ingredients

1 cup(s) uncooked quinoa
2 cup(s) grape tomatoes, or cherry tomatoes, red and/or yellow*
1 Tbsp olive oil
1 Tbsp white wine vinegar, or more to taste
1/2 tsp table salt, or more to taste
1/4 tsp black pepper, or more to taste
2 Tbsp chives, fresh, minced

Instructions

  • Put quinoa in a fine-mesh sieve or fine strainer. Place under cold running water until water runs clear (this eliminates the bitter taste contained in quinoa's coating); drain well. (Or you can buy certain brands of quinoa that are pre-rinsed.)

  • Place rinsed quinoa in a medium saucepan and cover with 2 cups of cold water; bring to a boil over high heat. Reduce heat to low, cover and simmer until the grains are translucent and the germ has come out of each grain, about 15 minutes. Cover and remove from heat; let sit for 5 minutes.

  • Spoon quinoa into a large bowl and set aside to cool. Meanwhile, finely chop tomatoes, reserving 2 tablespoons of the tomato juice; set tomatoes aside.

  • In a cup, combine tomato juice, oil, vinegar, salt, pepper and chives; stir well.

  • When quinoa is at room temperature, stir in chopped tomatoes; add tomato vinaigrette and toss again. Yields about 1 1/4 cups per serving.

Notes

  • *If desired, substitute 2 large tomatoes for the grape tomatoes.

    The simple ingredients in this recipe make it a perfect complement to spicy main dishes.

    Vary this recipe by using fresh basil, thyme, cilantro or oregano instead of the chives.
Here's an unpaid advertisement and a tip for you. Sometime while it's still July, the month of our nation's independence, get hold of the HBO mini-series John Adams and prepare to be entertained while you learn a ton about the Revolutionary War, our founding fathers, and how we became a nation. This is GREAT STUFF, and you get to feel all good about watching something historical, too. I have the cheap Netflix plan (one DVD at a time) and it's the first and only time I've been really sad that I have to wait to watch the next parts. I should have just purchased the set from Amazon (I think it's $39 there, quite a bit less than on the HBO site) so you be smarter and order it up so you can watch it again from time to time. I'm downloading the book, by David McCullough, to my iTouch Kindle app so I can read it on vacation. Let me know how you like it.

Sunday, July 11, 2010

Another day, another omelet


Today was a pretty typical eating day for a Sunday spent mostly at home, so here's what went down.

Breakfast was a 3-egg (1 whole + 2 whites) omelet stuffed with spinach, sauteed mushrooms and red onion, sharp cheddar and feta, and fresh tomatoes. Lucy had a pre-run wheat bagel with cream cheese and a banana.

Lunch was whole wheat orzo topped with barely sauteed fresh spinach in garlic oil, lots of freshly grated parmesan, and a few fresh tomatoes. Mine was also topped with a leftover grilled pork cutlet, and Lucy's with a Quorn (fake) chik'n patty. It was good, but needed a little something more---not sure what. Maybe just cooking the orzo in broth rather than water would have provided what I was looking for.

Dinner was stuffed peppers. The stuffing was a cumin-seasoned mixture of the leftover orzo, vegetable broth, Ro-tel, black beans, shoepeg corn, a little parmesan and some soy cheddar/mozzarella/jack mixture. And a side serving of roasted beets---more about that another day.

Snacks today were dry-roasted chickpeas, more roasted beets, and a Skinny Cow dulce de leche ice cream cup. Oh, and a chocolate chip oatmeal cookie. It's good to have teenage girls around who like to bake cookies on the spur of the moment.

Friday, July 9, 2010

Grilled Flank Steak with Onions


This Weight Watchers recipe has turned me into a flank steak lover. I cook mine a little more than shown in this photo. Let me know if you try it this weekend. Just be sure to buy extra flank steak....or you'll be sorry.
1 Tbsp olive oil, 3 Tbsp red wine vinegar
2 tsp dried oregano
2 tsp minced garlic
1/4 tsp black pepper, freshly ground
1 1/2 pound(s) lean flank steak
3/4 tsp table salt, divided
1 large red onion(s), cut into 1/4-inch-thick slices
2 spray(s) cooking spray

Instructions

  • Mix vinegar, oil, oregano, garlic and pepper in a ziploc bag. Add steak; turn to coat, making sure steak is coated with vinegar mixture. Marinate in refrigerator for at least 30 minutes.

  • Heat outdoor grill. I used my grill pan on the stovetop.

  • Remove steak from marinade; discard marinade. Sprinkle steak with 1/2 teaspoon salt. Coat onions with cooking spray; sprinkle with remaining 1/4 teaspoon salt.

  • Grill steak, turning once, until medium rare, about 15 minutes, or longer for desired degree of doneness. Let steak rest for 10 minutes. Do not even be tempted to skip the resting part.

  • While steak is resting, grill onions, turning occasionally, until lightly charred and tender, about 7 to 9 minutes.

  • To serve, thinly slice steak against the grain and place on a serving platter; scatter onions over top. Yields about 3 1/2 ounces steak and 1/3 cup onions per serving.

  • (If you're wondering what the green diamonds mean in the ingredient list, it's a Weight Watchers thing to show those are "filling foods"---something I should eat lots of and don't have to count points for. It's a GOOD THING.)

  • Hey, why are they called red onions when they're really purple?

Monday, July 5, 2010

The Runner's Dinner


Lucy plans to run at 8:30 tonight, pending a temperature check, so she requested dinner for 6:30. We had whole wheat pasta with fresh baby spinach lightly sauteed in 2 teaspoons of Pampered Chef's garlic-infused canola oil; then topped with fresh chopped tomatoes and minced garlic (both of these are uncooked) and freshly grated parmesan. Remember freshly cracked pepper and some kosher or sea salt. Speaking of salt, Mario pours a ton of salt into his nearly boiling water when he cooks pasta. He says the water should taste like the sea. I agree that it seems to bump up the flavor of the pasta if you add a good amount of table salt to the boiling water. Stay cool!

In memory of The Frugal Gourmet


Yesterday's Dinner

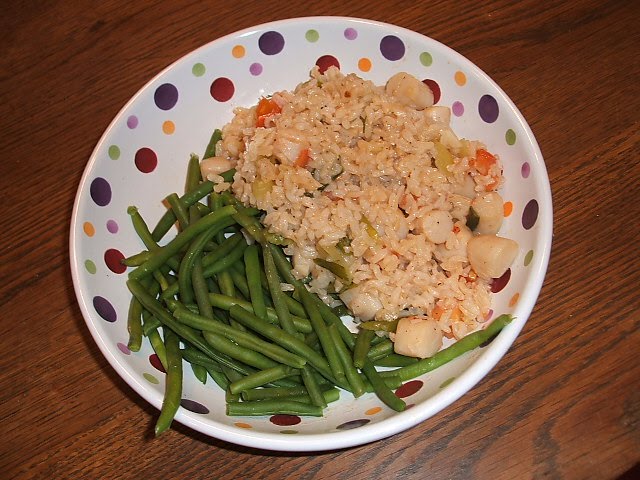
This is a scallops, rice, and tomato recipe I've made for oh, the past twenty-two years or so. Geez, I'm old. The Frugal Gourmet was a fav PBS cooking show when I lived in Washington, DC, and this is the only recipe of his that I wrote down and have continued to cook. The only change I've made to fit my healthier/Weight Watchers style of eating is to use brown rice. (BTW, I now actually prefer brown rice to white. Go figure. Lucy, on the other hand, prefers white; she says due to the texture.) Anyway, the rice is already cooked, so the whole recipe takes approx 10 minutes and is delicious. I usually make it in my stir-fry skillet with 2 cups of rice and have left-overs. But tonight it was so good, and I didn't have a full 2 cups of rice, so I just ate the whole stinkin' thing. So, there!


Heat 2 tsp. of oil in a stir-fry or other large skillet. Cook minced garlic in oil, then add green onions and bell or other pepper and cook for a couple of minutes. Add 1/4 to 1/2 pound of fresh bay scallops (the small ones) and cook for 2 minutes or so, then add a cut-up fresh tomato (seeded). Then add 2 cups of leftover brown rice, salt, and pepper. Stir well, cover skillet, and cook for 5 minutes. Turn off heat, check seasoning, and add a few shakes of Tabasco sauce. Makes 2 servings. I like it with a GIANT serving of haricot vert, but then I live near Trader Joe's and you probably don't.